
 With LXG having so much interest in smaller skirmish style games of late, I've decided it's time to build a new table. Fields of War will by my chronicle of my building a 4x8 DIY modular urban sprawl table, with enough notes and how-to's for you to follow along making one of your own if you'd like. With some step-by-step instructions, anyone can make an amazing tabletop!
Before we begin we need to envision the games that will be played on the table. The reason for this is two-fold: firstly to make sure the terrain is properly "in-genre" for the games to be played on it, and secondly to make sure that a proper amount of terrain is applied to the table for the games being played.

I think it's important to point out that "urban" tables are usable for a number of game types with only minor modifications, including Victorian/Steampunk, wild west, world war, modern, apocalyptic, and futuristic. The concepts remain the same, only the apparent building materials and structures change. So, to make a Wild West "one street town" for example, follow the directions but use sand or gravel on the road, and make the sidewalks more like plankwork.
There are a few terms I want to go over first to make my life easier:
Static Elements: These are terrain elements that are built into the table itself,and thus cannot be moved.
Static Elements: These are terrain elements that are built into the table itself,and thus cannot be moved.
Non-Static Elements: NSEs, also known as "scatter," are terrain pieces that can be moved around on the board to make games more unique.
Tile: This refers to the 2'x2' modular sections of the board, and forms the basis of our static elements.
Tile: This refers to the 2'x2' modular sections of the board, and forms the basis of our static elements.
Plates: These are often several NSEs grouped together onto a unifying base. Referred to in most games as "area terrain," although there are some times when a plate will contain a single small element.
So, throughout this series, I'll show you exactly what I'm using, tell you where I bought it, and for how much. I'll tell you the price of any tools you'll need, although tool costs won't be added into the running total of the board (many of these you have already, and they will be usable long after this project). At the end of each article in this series, you'll see a figure for my running total, and the price per square foot. As my table area is 4'x8', that means I'm currently building 32 square feet- unless I get excitable and make more than 8 tiles.
Step One: Planning
The single easier step to overlook. You need to know what you're building, how you're building it, and what you'll need to make it happen, or you're in for a sad day.
There are a few consumables you're going to need to finish the project, so it's best to get them up front. You won't use all of these up, and you might already have them, but it's best to figure them into the price now. A quick trip to my local Lowes yielded all of this:
First decide on your tile material. Your two best cost efficient options are MDF board, or insulation sheeting. Having used both, I'd say the MDF is sturdier and will hold up a lot longer. I've elected to go with insulation sheeting for this project as I want to have some elements with depth, and this is far, far easier to accomplish with insulation sheeting. This was purchased at Lowes for $20.25- conveniently in exactly the length and size I needed of 4'x8'. (Bring your tools to cut it down a bit in the parking lot, or it will be hard to fit in your trunk!)
 You will need to cut your tile material into 2 foot by 2 foot squares. (If using an off-sized table for your game, find the mid-point across the table and use that as your base measurement. Just understand all measurements I will be giving assume a 2x2 tile.)
For the sidewalks you have a few options. The cheapest is using foamboard and having to fill/ignore the edges (the "Cheaper but more Work" option). The second would be 3" strips of basswood, are a dollar and change a foot. You can use MDF and cut/score it if you have woodshop access. The last is vinyl or polystyrene sheets and cutting it down. However... this is where an ingenious gamer can work on the cheap. Chances are someone in your gaming group works in retail, and a lot of retail stores use polystyrene signage that is thrown away after sales. Talk to the powers that be, and get permission to snag it before it hits the dumpster, and you save yourself a lot of money. That's what I did in this case- 2mm vinyl signage. We'll assume I had to buy it though, and use that price for the sidewalk construction- I'm a bit under budget at the moment, so dropping $38.16 on nearly enough plasticard to build the table out of sounds like a plan.
Step Two: Design
My hope is to come up with plan for 8 different sections. Not that you'll generally want to do this- I'd recommend picking just a couple so the table has more unity- but this is as much about giving examples as it is about making my own table, so I'll be a little more free with design concepts. My plan currently is to do a block of store ruins, a bock of full stores, a park, a parking lot, a church & graveyard, an industrial complex, and a construction site. That leaves one to make a duplicate, unless someone helps me come up with a great idea for the last one. (Comment below!)

When making your design concepts, blueprints make life much easier in the long run. Some people use CAD, others 8x11 graph paper and expand out... I like to full-size my stuff as it makes templates easier to design and test. 1" grid easel pads are my best friend. This falls more under "tools" than "consumables because you shouldn't even need a quarter of it, and that's if you decide to use one in the first place.
Step Three: The Basic Tiles

Cut your tile material into 2'x2' squares. Once this is finished, cut your sidewalk material into 3" strips. (Your mileage may vary. 3" sections allows two 25mm/30mm bases to pass comfortably, and the city I live in has wide sidewalks so it works for me. If you want a tighter city feel, make them narrower.) You will need the strips to be 20" and 17" long. This allows the sidewalks to meet up, leaving a 4" right angle of street on each plate. (This means when assembled the street will be 8" wide.)
 Round the corner. Score a straight line down the length of the pieces 1/8" from the edge- this forms your curb. Score across the sidewalk every 3" to make "blocks." (Note that for more accuracy, you should probably make these 1" grids... but I've found that doing so feels like you're playing on, well, 1" grids...) If you want a more organic "ruined" look for the city, you can even crack some of the sidewalk pieces- either scoring or actually breaking it. Scuff up the underside of the sidewalk and where it will lie on the tile, and adhere with your glue.
Repeat this process as many times as is needed... I did eight, giving me the start of my 4'x8' table. See you next Tuesday when we start work on the first tile!
Project Total: $96.31 Cost per Square foot: $3.01
Any Commoents? Suggestions? Donations? Incriminations? Add them below!
So, throughout this series, I'll show you exactly what I'm using, tell you where I bought it, and for how much. I'll tell you the price of any tools you'll need, although tool costs won't be added into the running total of the board (many of these you have already, and they will be usable long after this project). At the end of each article in this series, you'll see a figure for my running total, and the price per square foot. As my table area is 4'x8', that means I'm currently building 32 square feet- unless I get excitable and make more than 8 tiles.
Step One: Planning
The single easier step to overlook. You need to know what you're building, how you're building it, and what you'll need to make it happen, or you're in for a sad day.
There are a few consumables you're going to need to finish the project, so it's best to get them up front. You won't use all of these up, and you might already have them, but it's best to figure them into the price now. A quick trip to my local Lowes yielded all of this:
- 128 oz of Wood Glue $14.87 No, you won't use it all. Get the big one anyway. It'll save you money in the long run.
- Snap Blade- $7.98 I know we all have exacto blades already, and you'll use that one too, but sometimes you'll need to cut an inch deep or more, and the standard hobby knife just doesn't cut it.
- 50 lbs of playground sand- $3.67 My basing material of choice for cost and versatility. You'll use a lot in this project... but certainly not all of it.
- A roll of painter's tape- $5.93 Yes you can get narrower for cheaper, but sooner or later you'll need the width, and until then you can cut down if need. To me it's not worth the dollar or so to get thinner.
- table lining drop cloth- $1.98 Again your mileage may vary, but spending 2 bucks to make sure my project doesn't accidentally embed itself into my table is worth it to me.
- loctite- $3.47 Don't believe the hype of more expensive adhesives. This little guy dries clear, has a great bond, and holds fast. Save your money for more soldierdolls.
First decide on your tile material. Your two best cost efficient options are MDF board, or insulation sheeting. Having used both, I'd say the MDF is sturdier and will hold up a lot longer. I've elected to go with insulation sheeting for this project as I want to have some elements with depth, and this is far, far easier to accomplish with insulation sheeting. This was purchased at Lowes for $20.25- conveniently in exactly the length and size I needed of 4'x8'. (Bring your tools to cut it down a bit in the parking lot, or it will be hard to fit in your trunk!)
 You will need to cut your tile material into 2 foot by 2 foot squares. (If using an off-sized table for your game, find the mid-point across the table and use that as your base measurement. Just understand all measurements I will be giving assume a 2x2 tile.)
For the sidewalks you have a few options. The cheapest is using foamboard and having to fill/ignore the edges (the "Cheaper but more Work" option). The second would be 3" strips of basswood, are a dollar and change a foot. You can use MDF and cut/score it if you have woodshop access. The last is vinyl or polystyrene sheets and cutting it down. However... this is where an ingenious gamer can work on the cheap. Chances are someone in your gaming group works in retail, and a lot of retail stores use polystyrene signage that is thrown away after sales. Talk to the powers that be, and get permission to snag it before it hits the dumpster, and you save yourself a lot of money. That's what I did in this case- 2mm vinyl signage. We'll assume I had to buy it though, and use that price for the sidewalk construction- I'm a bit under budget at the moment, so dropping $38.16 on nearly enough plasticard to build the table out of sounds like a plan.
Step Two: Design
My hope is to come up with plan for 8 different sections. Not that you'll generally want to do this- I'd recommend picking just a couple so the table has more unity- but this is as much about giving examples as it is about making my own table, so I'll be a little more free with design concepts. My plan currently is to do a block of store ruins, a bock of full stores, a park, a parking lot, a church & graveyard, an industrial complex, and a construction site. That leaves one to make a duplicate, unless someone helps me come up with a great idea for the last one. (Comment below!)
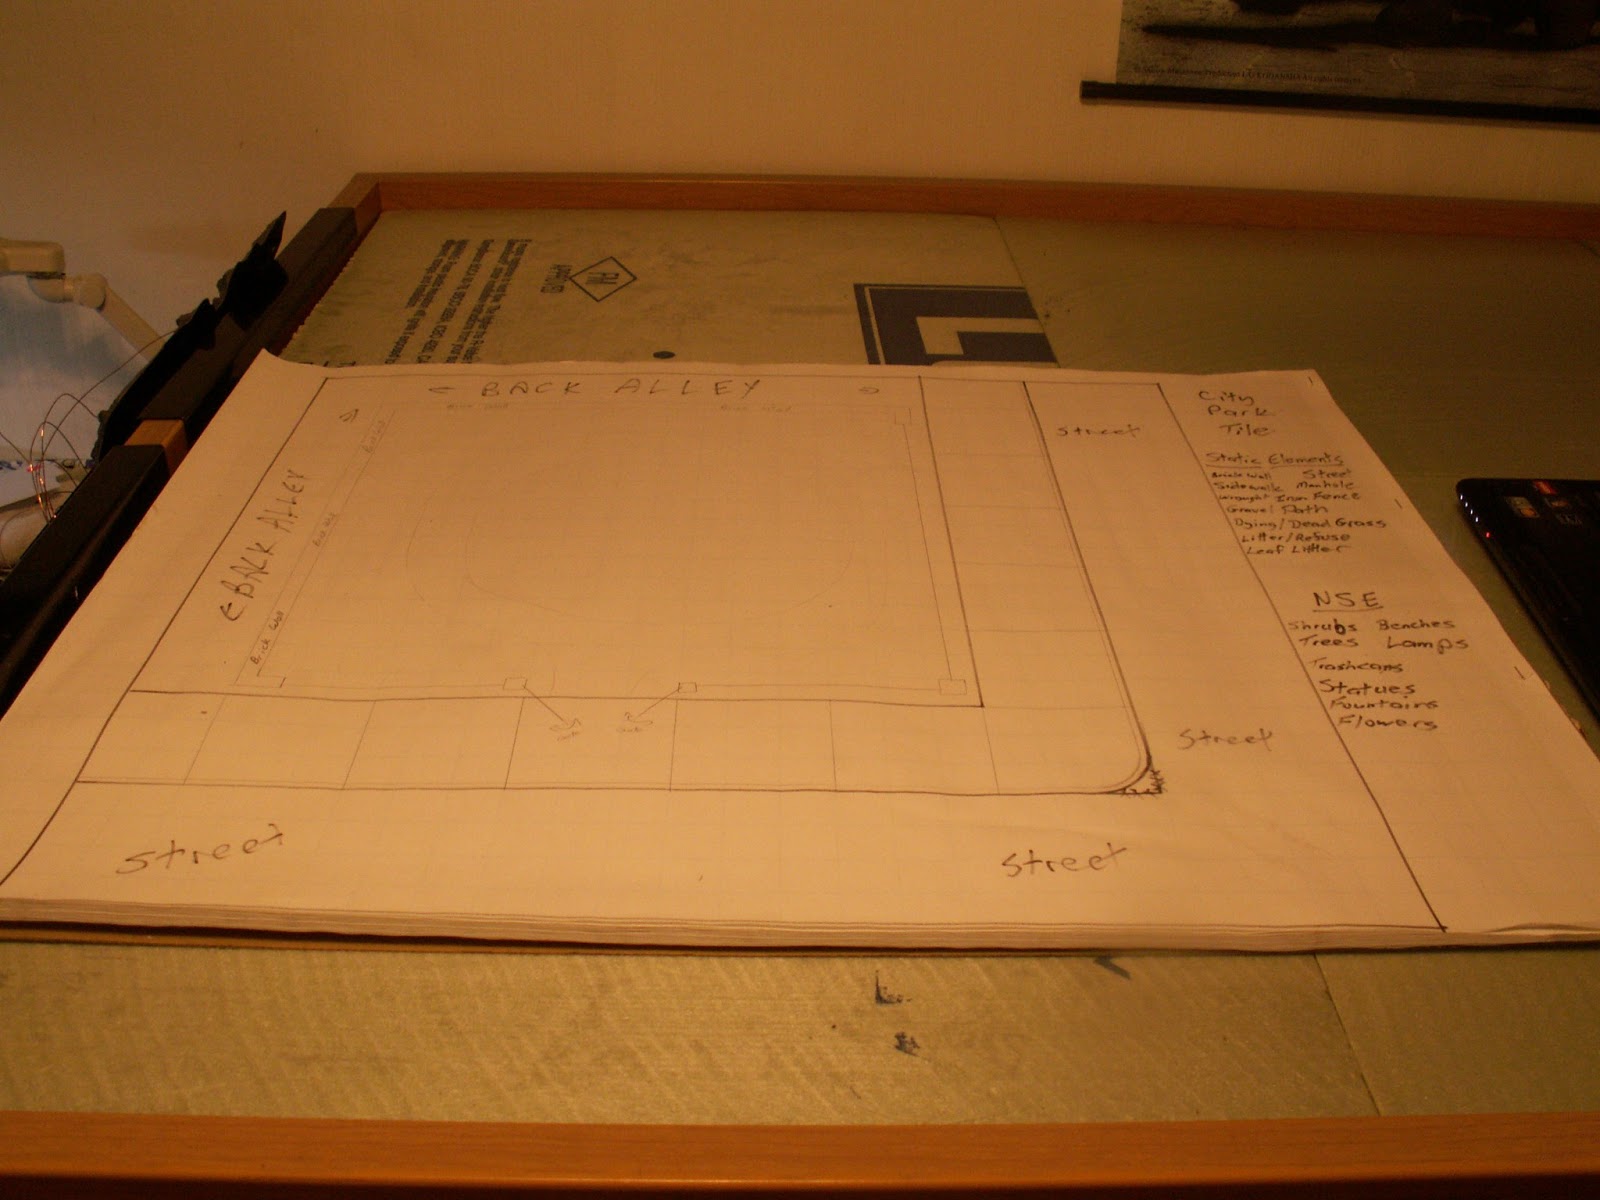
When making your design concepts, blueprints make life much easier in the long run. Some people use CAD, others 8x11 graph paper and expand out... I like to full-size my stuff as it makes templates easier to design and test. 1" grid easel pads are my best friend. This falls more under "tools" than "consumables because you shouldn't even need a quarter of it, and that's if you decide to use one in the first place.
Step Three: The Basic Tiles

Cut your tile material into 2'x2' squares. Once this is finished, cut your sidewalk material into 3" strips. (Your mileage may vary. 3" sections allows two 25mm/30mm bases to pass comfortably, and the city I live in has wide sidewalks so it works for me. If you want a tighter city feel, make them narrower.) You will need the strips to be 20" and 17" long. This allows the sidewalks to meet up, leaving a 4" right angle of street on each plate. (This means when assembled the street will be 8" wide.)

Repeat this process as many times as is needed... I did eight, giving me the start of my 4'x8' table. See you next Tuesday when we start work on the first tile!
Project Total: $96.31 Cost per Square foot: $3.01
Any Commoents? Suggestions? Donations? Incriminations? Add them below!
No comments:
Post a Comment